eBPF 概述

什么是 eBPF

eBPF(extended Berkeley Packet Filter)是一种运行在内核中的虚拟机,基于它可以在不修改内核代码、不加载额外的内核模块的前提下,安全、高效地扩展内核的功能。它能够运行 BPF 程序,用户可以按需注入 BPF 程序以在内核中运行。这些程序遵循 eBPF 提供的特定指令集,具有某些需要遵循的规则,并且只运行安全的程序。

eBPF 的使用正在兴盛,越来越多的 eBPF 程序被应用。例如,用 eBPF 代替 iptables 规则可以将应用发出的包直接转发到对端的 socket 来有效地处理数据包,通过缩短数据路径来加速数据平面。

eBPF 的核心原理

eBPF 的架构图如下:
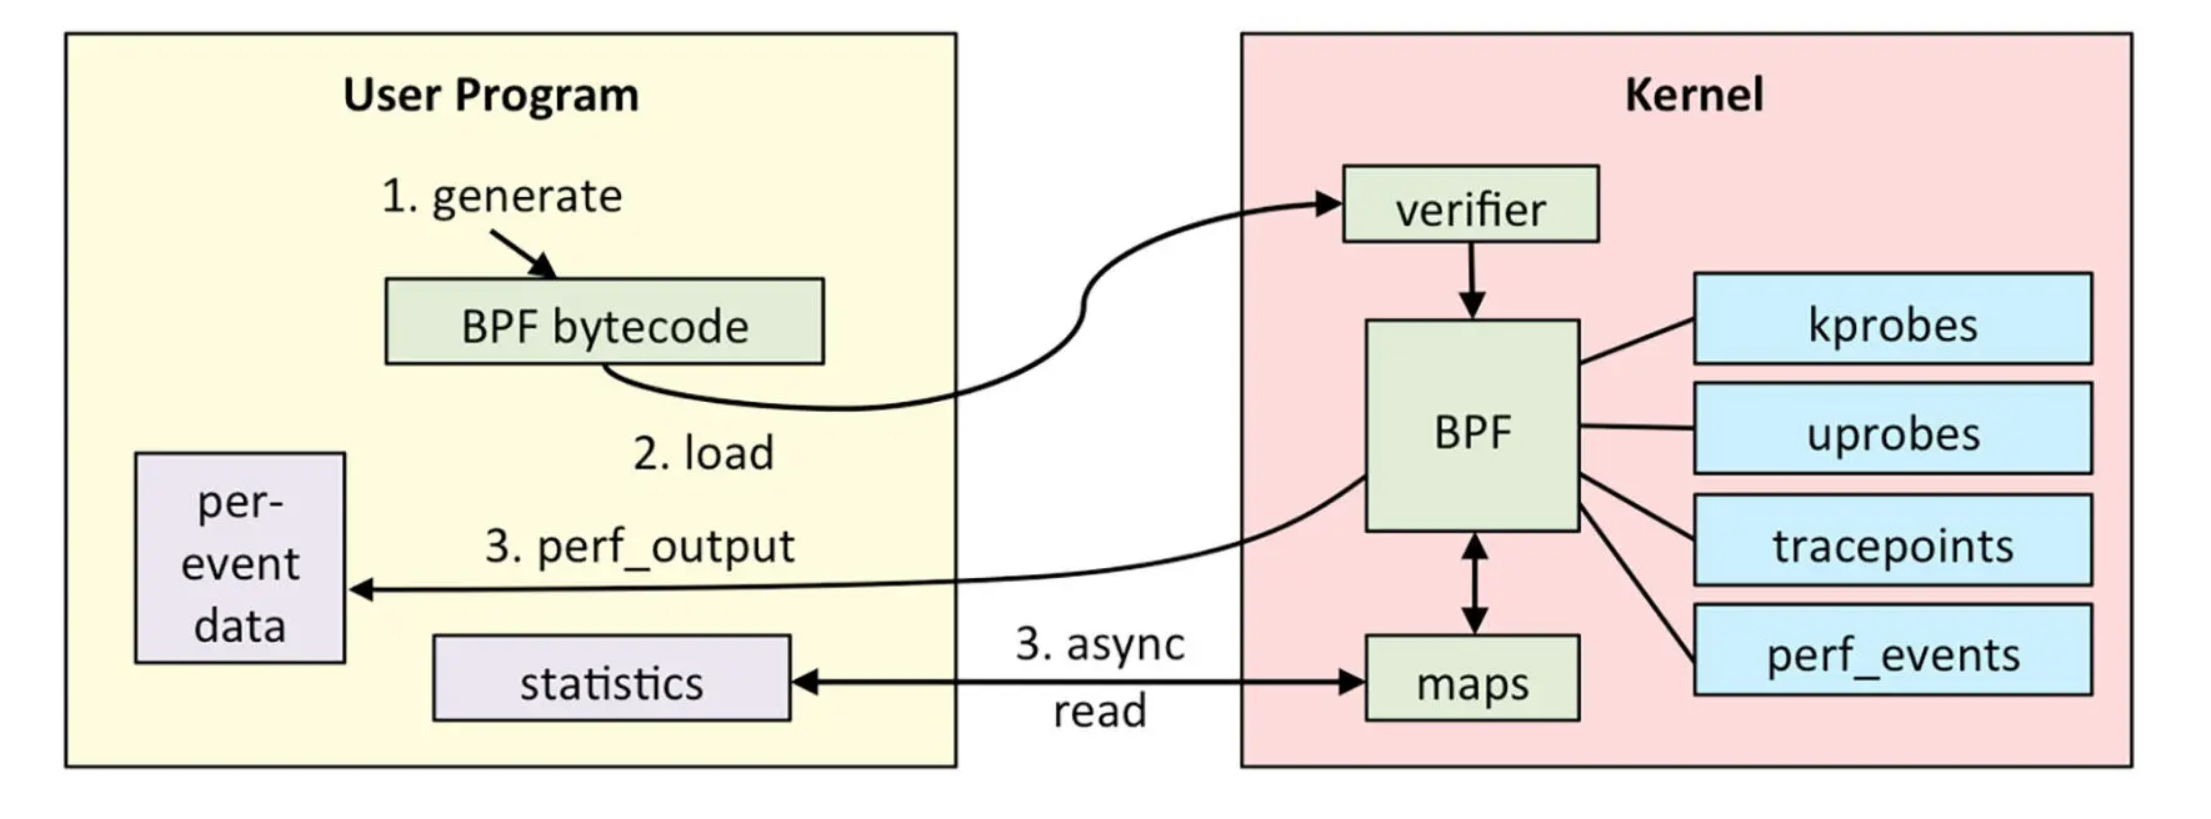
eBPF 分为两部分,分别是运行在用户空间的程序和运行在内核空间的程序。用户空间程序负责把 BPF 字节码加载到内核空间的 eBPF 虚拟机中,并在需要的时候读取内核返回的各种事件信息、统计信息;而内核中的 BPF 虚拟机负责执行内核中的特定事件,如果需要传递数据,就将执行结果通过 BPF map 或 perf 缓冲区中的 perf-events 发送至用户空间。整个流程如下:

  1. 编写好的 BPF 程序会被 Clang、LLVM 等工具编译成 BPF 的字节码(因为 BPF 程序并不是普通的 ELF 程序,而是要运行在虚拟机中的字节码)。eBPF 程序中还会包含配置的事件源,所谓事件源其实就是一些需要 hook 的挂载点。

  2. 加载器会在程序运行前通过 eBPF 系统调用加载到内核,这时候验证器会验证字节码的安全性,比如校验循环次数必须在有限时间内结束等。当校验通过后,一旦挂载的事件发生,就会在 eBPF 虚拟机中执行字节码的逻辑。

  3. (可选)逐个事件输出,或通过 BPF map 返回统计数据、调用栈数据,传递至用户空间。

eBPF 支持静态追踪 socket、tracepoint、USDT,动态追踪 kprobe、uprobe 等几大类探针。

动态追踪

eBPF 提供了:

  • 面向内核的 kprobe/kretprobe,k = kernel
  • 面向应用的 uprobe/uretprobe,u = user land

分别用于探测函数入口处和函数返回(ret)处的信息。

kprobe/kretprobe 可以探测内核大部分函数,出于安全考虑,有部分内核函数不允许安装探针,有可能会导致跟踪失败。

uprobe/uretprobe 用来实现用户态程序动态追踪的机制。与 kprobe/kretprobe 类似,区别在于跟踪的函数是用户程序中的函数而已。

动态追踪技术依赖内核和应用的符号表,对于那些 inline 或者 static 函数则无法直接安装探针,需要自行通过 offset 实现。可以借助 nm 或者 strings 指令查看应用的符号表。

动态追踪技术的原理与 GDB 类似,当对某段代码安装探针,内核会将目标位置指令复制一份,并替换为 int3 中断, 执行流跳转到用户指定的探针 handler,再执行备份的指令,如果此时也指定了 ret 探针,也会被执行,最后再跳转回原来的指令序列。

接下来看看如何进行动态追踪。首先编写一段 main.go 测试代码:

1
2
3
4
5
6
7
8
9
package main

func main() {
println(sum(3, 3))
}

func sum(a, b int) int {
return a + b
}

接下来,关闭内联优化编译代码,执行 go build -gcflags="-l" ./main.go 命令。如果开启内联优化的话,很可能 Go 的编译器会在编译期消除函数调用,这样 eBPF 就会找不到函数对应的探针了。

下一步,编写 bpftrace 脚本 main.pt

1
2
3
4
5
6
7
8
BEGIN{
printf("Hello!\n");
}
uprobe:./main:main.sum {printf("a: %d b: %d\n", reg("ax"), reg("bx"))}
uretprobe:./main:main.sum {printf("retval: %d\n", retval)}
END{
printf("Bye!\n");
}

最后执行 bpftrace 监控这个函数调用,运行 bpftrace main.pt 命令,然后按下 Ctl+C 退出,得到下面的输出:

1
2
3
4
Hello!
a: 3 b: 3
retval: 6
^CBye!

静态追踪

“静态”是指探针的位置、名称都是在代码中硬编码的,编译时就确定了。静态追踪的实现原理类似 callback,当被激活时执行,关闭时不执行,性能比动态追踪高一些。其中:

  • tracepoint 是内核中的
  • USDT = Userland Statically Defined Tracing,是应用中的

静态追踪已经在内核和应用中包含了探针参数信息,可以直接通过 args->参数名 访问函数参数。tracepoint 的 参数信息可以通过 bpftrace -lv 查看,例如:

1
2
3
4
5
6
7
8
bpftrace -lv tracepoint:syscalls:sys_enter_openat
# 输出:
# tracepoint:syscalls:sys_enter_openat
# int __syscall_nr;
# int dfd;
# const char * filename;
# int flags;
# umode_t mode;

静态追踪通过 args->filename 访问 sys_enter_openat 的 filename 参数:

1
2
3
4
5
6
7
8
9
bpftrace -e 'tracepoint:syscalls:sys_enter_openat { printf("%s %s\n", comm, str(args->filename)); }'
# 输出:
# Attaching 1 probe...
# uwsgi /proc/self/stat
# uwsgi /proc/self/fd
# uwsgi /proc/self/statm
# uwsgi /proc/loadavg
# uwsgi /proc/self/io
# ...

其中 comm 表示父进程的名字。

k8s 三种 Service

本文简单介绍 k8s 的三种 Service: ClusterIP、NodePort、LoadBalancer。

ClusterIP

ClusterIP 通过集群内部 IP 地址暴露服务,但该地址仅在集群内部可见,无法被集群外部的客户端访问。ClusterIP 是 Service 的默认类型,内部 IP 建议由 k8s 动态指定一个,也支持手动指定。示例:

1
2
3
4
5
6
7
8
9
10
11
apiVersion: v1
kind: Service
metadata:
name: nginx-pod-service
spec:
type: ClusterIP
ports:
- port: 8080
targetPort: 80
selector:
app: nginx

创建 ClusterIP 后,查看内部 IP,并进行访问:

1
2
3
4
5
6
7
8
9
10
11
12
13
14
15
16
17
18
19
20
21
22
23
24
25
26
27
28
root@cloud:~# kubectl get svc -o wide
NAME TYPE CLUSTER-IP EXTERNAL-IP PORT(S) AGE SELECTOR
kubernetes ClusterIP 10.96.0.1 <none> 443/TCP 6d2h <none>
nginx-pod-service ClusterIP 10.100.23.74 <none> 8080/TCP 6s app=nginx
root@cloud:~# curl 10.100.23.74:8080
<!DOCTYPE html>
<html>
<head>
<title>Welcome to nginx!</title>
<style>
html { color-scheme: light dark; }
body { width: 35em; margin: 0 auto;
font-family: Tahoma, Verdana, Arial, sans-serif; }
</style>
</head>
<body>
<h1>Welcome to nginx!</h1>
<p>If you see this page, the nginx web server is successfully installed and
working. Further configuration is required.</p>

<p>For online documentation and support please refer to
<a href="http://nginx.org/">nginx.org</a>.<br/>
Commercial support is available at
<a href="http://nginx.com/">nginx.com</a>.</p>

<p><em>Thank you for using nginx.</em></p>
</body>
</html>

NodePort

NodePort 是 ClusterIP 的增强类型,它在 ClusterIP 的基础之上,在每个节点上使用一个相同的端口号将外部流量引入到该 Service 上来。示例:

1
2
3
4
5
6
7
8
9
10
11
12
apiVersion: v1
kind: Service
metadata:
name: nginx-pod-service
spec:
type: NodePort
ports:
- port: 8080
targetPort: 80
nodePort: 30080
selector:
app: nginx

创建后,在集群外可以通过节点IP:30080访问该服务。

LoadBalancer

LoadBalancer 是 NodePort 的增强类型,为节点上的 NodePort 提供一个外部负载均衡器,需要公有云支持。示例:

1
2
3
4
5
6
7
8
9
10
11
12
13
apiVersion: v1
kind: Service
metadata:
name: nginx-pod-service
spec:
type: LoadBalancer
ports:
- port: 8080
targetPort: 80
nodePort: 30080
loadBalancerIP: 1.2.3.4
selector:
app: nginx

创建后,在集群外可以通过1.2.3.4:30080访问该服务。

k8s 集群中的 port

本文介绍 k8s 集群外访问集群内部服务不同方式下的 port。

hostPort

出现在 Deployment、Pod 等资源对象描述文件中的容器部分,类似于 docker run -p <containerPort>:<hostPort>。containerPort 为容器暴露的端口;hostPort 为容器暴露的端口直接映射到的主机端口。例如:

1
2
3
4
5
6
7
8
9
10
11
12
13
14
15
apiVersion: apps/v1
kind: Deployment
...
spec:
...
template:
...
spec:
nodeName: node1
containers:
- name: nginx
image: nginx
ports:
- containerPort: 80 # containerPort是pod内部容器的端口
hostPort: 30080

集群外访问方式:node1的IP:30080

nodePort

出现在 Service 描述文件中,Service 为 NodePort 类型时。port 为在k8s集群内服务访问端口;targetPort 为关联 pod 对外开放端口,与上述 containerPort 保持一致;nodePort 为集群外访问端口,端口范围为 30000-32767。例如:

1
2
3
4
5
6
7
8
9
10
11
12
13
14
apiVersion: v1
kind: Service
metadata:
name: nginx-pod-service
labels:
app: nginx
spec:
type: NodePort
ports:
- port: 8080 # port是k8s集群内部访问Service的端口
targetPort: 80 # targetPort是pod的端口,从port和nodePort来的流量经过kube-proxy流入到pod的targetPort上
nodePort: 30080
selector:
app: nginx

集群外访问方式:节点IP:30080

TDengine 部署并与 Kuiper 交互

安装和启动

Ubuntu 系统使用 apt-get 工具从官方仓库安装

1
2
3
4
5
wget -qO - http://repos.taosdata.com/tdengine.key | sudo apt-key add -
echo "deb [arch=amd64] http://repos.taosdata.com/tdengine-stable stable main" | sudo tee /etc/apt/sources.list.d/tdengine-stable.list
sudo apt-get update
apt-cache policy tdengine
sudo apt-get install tdengine

启动

1
systemctl start taosd

执行 TDengine 客户端程序,只要在 Linux 终端执行 taos 即可

1
taos

与 Kuiper 交互

安装 TDengine 插件,注意当前 TDengine 客户端版本为 2.4.0.12

1
curl -d "{\"name\":\"tdengine\",\"file\":\"https://packages.emqx.io/kuiper-plugins/1.4.3/debian/sinks/tdengine_amd64.zip\",\"shellParas\": [\"2.4.0.12\"]}" http://127.0.0.1:9081/plugins/sinks

进入 TDengine 客户端,创建 test 用户

1
create user test pass 'test';

切换 test 用户,创建数据库和数据表

1
2
3
4
5
6
create database test;

create stable sensordata (time timestamp,temperature float,humidity float) tags (location binary(64));
create table bedroom_sensordata using sensordata tags("bedroom");
create table balcony_sensordata using sensordata tags("balcony");
create table toilet_sensordata using sensordata tags("toilet");

创建 device1、device2、device3 三个 stream,分别接收MQTT test/bedroom、test/balcony、test/toilet 主题消息

1
2
3
kuiper create stream device1 '(temperature float, humidity float) WITH (FORMAT="JSON", DATASOURCE="test/bedroom")'
kuiper create stream device2 '(temperature float, humidity float) WITH (FORMAT="JSON", DATASOURCE="test/balcony")'
kuiper create stream device3 '(temperature float, humidity float) WITH (FORMAT="JSON", DATASOURCE="test/toilet")'

编写 demoRule1,demoRule2,demoRule3 规则

1
2
3
4
5
6
7
8
9
10
11
12
13
14
15
16
17
18
19
20
21
22
23
24
25
26
27
28
29
30
31
32
33
34
35
36
37
38
39
40
41
42
43
44
45
46
47
48
49
50
51
52
53
54
55
56
57
58
59
60
61
62
63
64
65
66
67
68
69
70
71
72
73
74
75
# demoRule1
{
"sql": "SELECT temperature,humidity FROM device1 WHERE isNull(temperature,humidity) = false",
"actions": [
{
"tdengine": {
"provideTs": false,
"tsFieldName": "time",
"port": 0,
"ip": "127.0.0.1",
"user": "test",
"password": "test",
"database": "test",
"table": "bedroom_sensordata",
"fields": [
"temperature",
"humidity"
]
}
},
{
"log": {}
}
]
}
# demoRule2
{
"sql": "SELECT temperature,humidity FROM device2 WHERE isNull(temperature,humidity) = false",
"actions": [
{
"tdengine": {
"provideTs": false,
"tsFieldName": "time",
"port": 0,
"ip": "127.0.0.1",
"user": "test",
"password": "test",
"database": "test",
"table": "balcony_sensordata",
"fields": [
"temperature",
"humidity"
]
}
},
{
"log": {}
}
]
}
# demoRule3
{
"sql": "SELECT temperature,humidity FROM device3 WHERE isNull(temperature,humidity) = false",
"actions": [
{
"tdengine": {
"provideTs": false,
"tsFieldName": "time",
"port": 0,
"ip": "127.0.0.1",
"user": "test",
"password": "test",
"database": "test",
"table": "toilet_sensordata",
"fields": [
"temperature",
"humidity"
]
}
},
{
"log": {}
}
]
}

创建 demoRule 规则

1
2
3
kuiper create rule demoRule1 -f demoRule1
kuiper create rule demoRule2 -f demoRule2
kuiper create rule demoRule3 -f demoRule3

kuiper show rules,查看规则是否处于运行状态

1
2
3
4
5
6
7
8
9
10
11
12
13
14
15
Connecting to 127.0.0.1:20498... 
[
{
"id": "demoRule1",
"status": "Running"
},
{
"id": "demoRule2",
"status": "Running"
},
{
"id": "demoRule3",
"status": "Running"
}
]

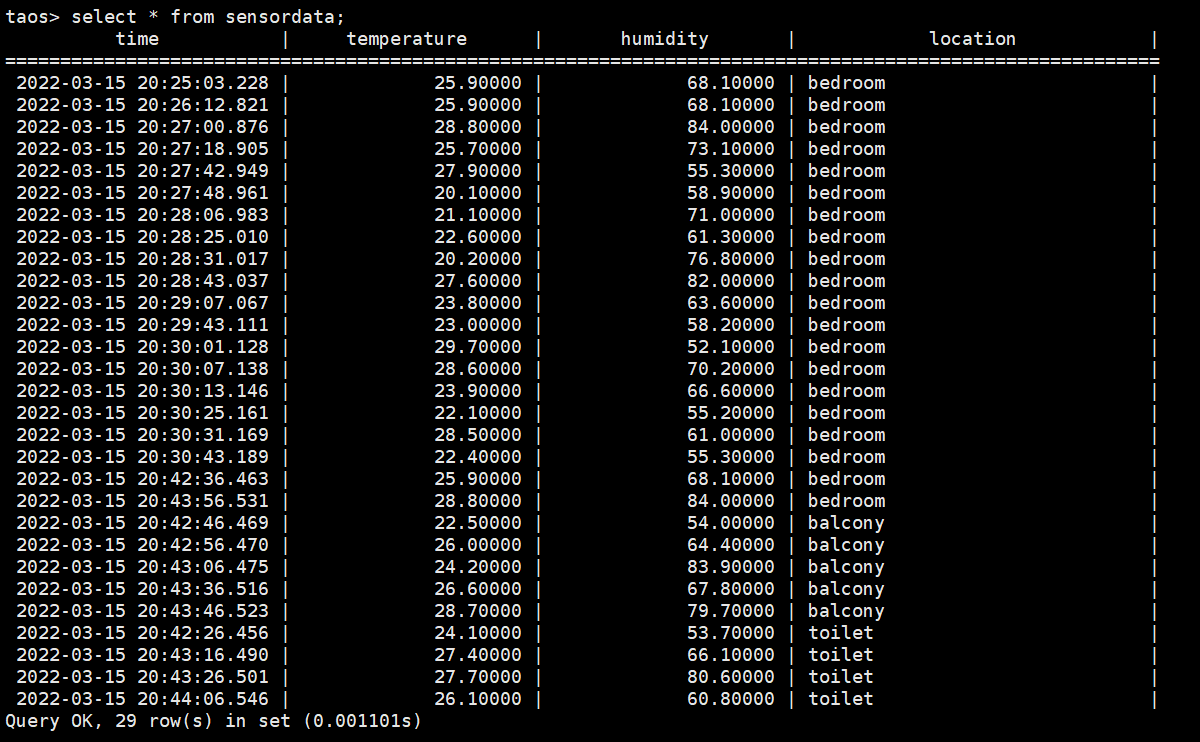
用 Go 编写测试代码(见附录),向 MQTT Broker 发送温度和湿度数据。一段时间过后,在 TDengine 客户端查看接收到的数据

附录

Go 发送消息测试完整代码:

1
2
3
4
5
6
7
8
9
10
11
12
13
14
15
16
17
18
19
20
21
22
23
24
25
26
27
28
29
30
31
32
33
34
35
36
37
38
39
40
41
42
43
44
45
46
47
48
49
50
51
52
53
package main

import (
"fmt"
"log"
"math/rand"
"os"
"time"

mqtt "github.com/eclipse/paho.mqtt.golang"
)

var f mqtt.MessageHandler = func(client mqtt.Client, msg mqtt.Message) {
fmt.Printf("TOPIC: %s\n", msg.Topic())
fmt.Printf("MSG: %s\n", msg.Payload())
}

func genPair() (float64, float64) {
t := (200.0 + float64(rand.Intn(120))) / 10.0
h := (500.0 + float64(rand.Intn(350))) / 10.0
return t, h
}

func genLocation() string {
locations := []string{"bedroom", "balcony", "toilet"}
i := rand.Intn(3)
return locations[i]
}

func main() {
mqtt.DEBUG = log.New(os.Stdout, "", 0)
mqtt.ERROR = log.New(os.Stdout, "", 0)
opts := mqtt.NewClientOptions().AddBroker("mqtt://175.178.160.127:1883")

opts.SetKeepAlive(60 * time.Second)
opts.SetDefaultPublishHandler(f)
opts.SetPingTimeout(1 * time.Second)

c := mqtt.NewClient(opts)
if token := c.Connect(); token.Wait() && token.Error() != nil {
panic(token.Error())
}

// pub msg loop
for {
t, h := genPair()
payload := fmt.Sprintf("{\"temperature\":%f, \"humidity\":%f}", t, h)
token := c.Publish("test/"+genLocation(), 0, false, payload)
token.Wait()
// wait 10s
time.Sleep(10 * time.Second)
}
}

Ubuntu 安装使用 Kuiper

下载和安装

通过 https://github.com/lf-edge/ekuiper/releases 获取安装包

1
2
wget https://github.com/lf-edge/ekuiper/releases/download/1.4.3/kuiper-1.4.3-linux-amd64.deb
sudo dpkg -i kuiper-1.4.3-linux-amd64.deb

启动 eKuiper 服务器

1
sudo systemctl start kuiper

运行第一个规则流

定义输入流

创建一个名为 demo 的流,该流使用 DATASOURCE 属性中指定的 MQTT test 主题。

1
kuiper create stream demo '(temperature float, humidity bigint) WITH (FORMAT="JSON", DATASOURCE="test")'

MQTT 源将通过 tcp://localhost:1883 连接到 MQTT 消息服务器,如果 MQTT 消息服务器位于别的位置,请在etc/mqtt_source.yaml中进行修改。

1
2
3
4
default:
qos: 1
sharedsubscription: true
servers: [tcp://127.0.0.1:1883]

使用 kuiper show streams 命令来查看是否创建了 demo 流。

1
kuiper show streams

通过查询工具测试流

通过 kuiper query 命令对其进行测试

1
2
3
kuiper query

kuiper > select count(*), avg(humidity) as avg_hum, max(humidity) as max_hum from demo where temperature > 30 group by TUMBLINGWINDOW(ss, 5);

编写规则

rule 由三部分组成:

  • 规则名称:它必须是唯一的
  • sql:针对规则运行的查询
  • 动作:规则的输出动作

myRule 文件的内容。对于在1分钟内滚动时间窗口中的平均温度大于30的事件,它将打印到日志中。

1
2
3
4
5
6
{
"sql": "SELECT temperature from demo where temperature > 30",
"actions": [{
"log": {}
}]
}

运行 kuiper rule 命令来创建 ruleDemo 规则

1
kuiper create rule ruleDemo -f myRule

测试规则

使用 MQTT 客户端将消息发布到 test 主题即可。消息应为 json 格式

1
2
mosquitto_pub -h 192.168.181.97 -t "test" -m "{\"temperature\":31.2, \"humidity\": 77}"
mosquitto_pub -h 192.168.181.97 -t "test" -m "{\"temperature\":29, \"humidity\": 80}"

查看日志

1
tail -f /var/log/kuiper/stream.log

管理规则

开启规则

1
kuiper start rule ruleDemo

暂停规则

1
kuiper stop rule ruleDemo

删除规则

1
kuiper drop rule ruleDemo

KubeEdge 边缘部分 Edged 简析

本文基于 commit 9a7e140b42abb4bf6bcabada67e3568f73964278。

概述

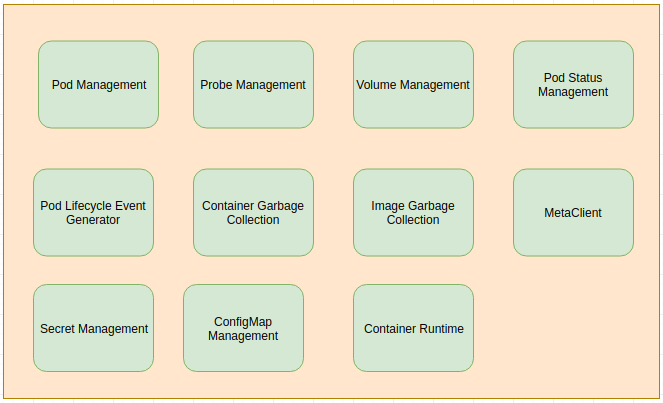
Edged 是运行在边缘节点的代理(轻量化的 kubelet),用于管理容器化的应用程序。Edged 内部模块如图所示:

代码入口

Edged 的注册和启动过程代码在 edge/pkg/edged/edged.go 中。

Register 调用了 newEdged,newEdged 做了以下事情:

  1. 初始化 pod status 管理器
  2. 初始化 edged 的 livenessManager、readinessManager、startupManager
  3. 创建并启动作为 grpc 服务器运行的 docker shim
  4. 初始化运行时服务 runtimeService 和镜像服务 imageService
  5. 初始化容器生命周期管理器 clcm
  6. 初始化容器日志管理器 logManager
  7. 初始化通用容器运行时服务 containerRuntime
  8. 创建运行时缓存 runtimeCache
  9. 初始化 edged 的镜像存放地 Provider
  10. 初始化镜像垃圾回收管理器 imageGCManager
  11. 初始化容器垃圾回收器 containerGCManager
  12. 初始化 edged 的 server

Start 做了以下事情:

  1. 初始化 edged 的 volume plugin 管理器 volumePluginMgr
  2. 初始化 edged 节点的模块
  3. 新建配置管理器configMapManager
  4. 初始化并启动 volume 管理器 volumeManager
  5. 启动 edged 的探针管理器 probeManager
  6. 启动 pod 状态管理器 statusManager 和 pod 生命周期事件生成器 pleg
  7. 启动 pod 增加和删除消息队列
  8. 启动 pod 监听事件循环
  9. 启动 edged 的 http server
  10. 启动镜像和容器的垃圾回收服务
  11. 初始化和启动 edged 的插件服务
  12. 在 clcm 中启动 CPU 管理器
  13. 最后调用 syncPod,启动与 pod 进行事件同步的服务

edged 与容器运行时

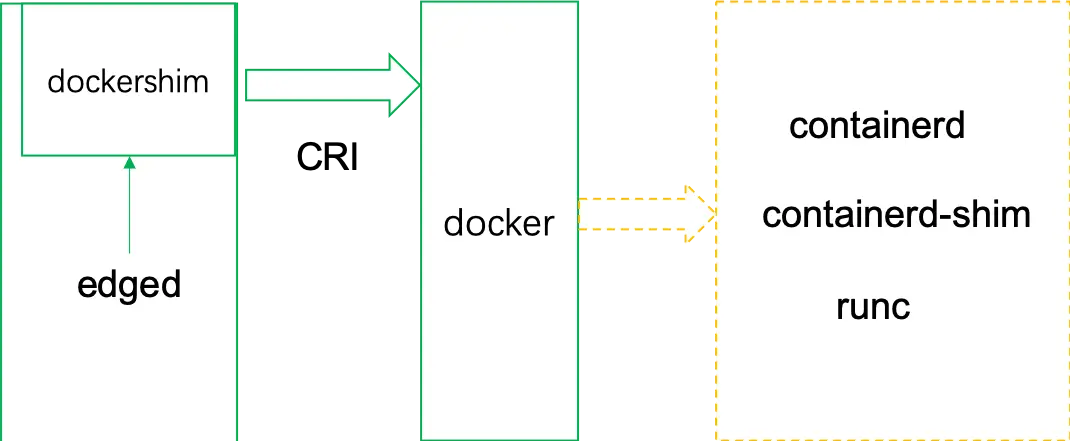
edged 与容器运行时(container runtime)的调用关系可以总结为下图:

可以看出 edged 首先启动作为 grpc 服务器运行的 docker shim,然后 edged 通过调用 docker shim 的 grpc server,來实现与容器运行时(container runtime)的交互,最后 docker shim 的 grpc server 将 edged 具体操作传递给容器运行时。

edged 如何实现边缘自治

首先看 edged 启动时调用的 syncPod,它向 metamanager 发送一条请求(QueryOperation 类型消息),来请求数据库中现有的 pod 信息。然后开始循环接收消息,后面对消息的类型进行判断,类型有 pod、configmap、secret、以及 volume:

1
2
3
4
5
6
7
8
9
10
11
12
13
14
15
16
17
18
19
20
21
22
23
24
25
26
27
28
29
30
31
32
33
34
35
36
37
38
39
40
41
42
43
44
45
func (e *edged) syncPod() {
time.Sleep(10 * time.Second)

//when starting, send msg to metamanager once to get existing pods
info := model.NewMessage("").BuildRouter(e.Name(), e.Group(), e.namespace+"/"+model.ResourceTypePod,
model.QueryOperation)
beehiveContext.Send(metamanager.MetaManagerModuleName, *info)
for {
......
result, err := beehiveContext.Receive(e.Name())
......
switch resType {
case model.ResourceTypePod:
if op == model.ResponseOperation && resID == "" && result.GetSource() == metamanager.MetaManagerModuleName {
err := e.handlePodListFromMetaManager(content)
if err != nil {
klog.Errorf("handle podList failed: %v", err)
continue
}
e.setInitPodReady(true)
} else if op == model.ResponseOperation && resID == "" && result.GetSource() == EdgeController {
err := e.handlePodListFromEdgeController(content)
if err != nil {
klog.Errorf("handle controllerPodList failed: %v", err)
continue
}
e.setInitPodReady(true)
} else {
err := e.handlePod(op, content)
if err != nil {
klog.Errorf("handle pod failed: %v", err)
continue
}
}
case model.ResourceTypeConfigmap:
......
case model.ResourceTypeSecret:
......
case constants.CSIResourceTypeVolume:
......
default:
......
}
}
}

这里重点关心pod,消息需要通过 result.GetSource() 字段判断来源,可能是 MetaManager 来的,也有可能是 EdgeController 来的。在断网环境下只有可能是 MetaManager 发送的。

handlePodListFromMetaManager 遍历收到的消息中的 pod 内容,调用 addPod 将 pod 全部加入 podAdditionQueue 队列,再调用 updatePodStatus 删除或更新 pod,将 pod status 更新到数据库中:

1
2
3
4
5
6
7
8
9
10
11
12
13
14
15
16
17
18
19
20
21
22
23
24
func (e *edged) handlePodListFromMetaManager(content []byte) (err error) {
var lists []string
err = json.Unmarshal([]byte(content), &lists)
if err != nil {
return err
}

for _, list := range lists {
var pod v1.Pod
err = json.Unmarshal([]byte(list), &pod)
if err != nil {
return err
}
if filterPodByNodeName(&pod, e.nodeName) {
e.addPod(&pod)
if err = e.updatePodStatus(&pod); err != nil {
klog.Errorf("handlePodListFromMetaManager: update pod %s status error", pod.Name)
return err
}
}
}

return nil
}

另外 edged 启动时会调用 podAddWorkerRun,它会在后台不断从 podAdditionQueue 中 get,后面就和 kubelet 一样开始创建容器。

More

关于 Edged 部分内部模块执行的流程图请见 Edged

KubeEdge 边缘部分 EventBus&ServiceBus 简析

本文基于 commit 9a7e140b42abb4bf6bcabada67e3568f73964278。

概述

EventBus 是一个与 MQTT 服务器 (mosquitto) 交互的 MQTT 客户端,为其他组件提供订阅和发布功能;ServiceBus 是一个运行在边缘的 HTTP 客户端。

EventBus

edge/pkg/eventbus/eventbus.go:

1
2
3
4
5
6
7
8
9
10
11
12
13
14
15
16
17
18
19
20
21
22
23
24
25
26
27
28
29
30
31
32
33
func (eb *eventbus) Start() {
if eventconfig.Config.MqttMode >= v1alpha1.MqttModeBoth {
hub := &mqttBus.Client{
MQTTUrl: eventconfig.Config.MqttServerExternal,
SubClientID: eventconfig.Config.MqttSubClientID,
PubClientID: eventconfig.Config.MqttPubClientID,
Username: eventconfig.Config.MqttUsername,
Password: eventconfig.Config.MqttPassword,
}
mqttBus.MQTTHub = hub
hub.InitSubClient()
hub.InitPubClient()
klog.Infof("Init Sub And Pub Client for external mqtt broker %v successfully", eventconfig.Config.MqttServerExternal)
}

if eventconfig.Config.MqttMode <= v1alpha1.MqttModeBoth {
// launch an internal mqtt server only
mqttServer = mqttBus.NewMqttServer(
int(eventconfig.Config.MqttSessionQueueSize),
eventconfig.Config.MqttServerInternal,
eventconfig.Config.MqttRetain,
int(eventconfig.Config.MqttQOS))
mqttServer.InitInternalTopics()
err := mqttServer.Run()
if err != nil {
klog.Errorf("Launch internal mqtt broker failed, %s", err.Error())
os.Exit(1)
}
klog.Infof("Launch internal mqtt broker %v successfully", eventconfig.Config.MqttServerInternal)
}

eb.pubCloudMsgToEdge()
}

MqttMode 分 MqttModeInternal、MqttModeBoth 和 MqttModeExternal 三种。当 eventconfig.Config.MqttMode >= v1alpha1.MqttModeBoth 将 MQTT 代理启动在 eventbus 之外,eventbus 作为独立启动的 MQTT 代理的客户端与其交互;当 eventconfig.Config.MqttMode <= v1alpha1.MqttModeBoth 时,在 eventbus 内启动一个 MQTT 代理,负责与终端设备交互。

InitSubClient

InitSubClient 设置参数启动 subscribe 连接:

1
2
3
4
5
6
7
8
9
10
11
12
13
14
15
16
17
18
func (mq *Client) InitSubClient() {
timeStr := strconv.FormatInt(time.Now().UnixNano()/1e6, 10)
right := len(timeStr)
if right > 10 {
right = 10
}
// if SubClientID is NOT set, we need to generate it by ourselves.
if mq.SubClientID == "" {
mq.SubClientID = fmt.Sprintf("hub-client-sub-%s", timeStr[0:right])
}
subOpts := util.HubClientInit(mq.MQTTUrl, mq.SubClientID, mq.Username, mq.Password)
subOpts.OnConnect = onSubConnect
subOpts.AutoReconnect = false
subOpts.OnConnectionLost = onSubConnectionLost
mq.SubCli = MQTT.NewClient(subOpts)
util.LoopConnect(mq.SubClientID, mq.SubCli)
klog.Info("finish hub-client sub")
}

onSubConnect 和 onSubConnectionLost 定义了当连接和失联时的处理逻辑。eventbus 订阅以下 topic:

1
2
3
4
5
6
7
8
9
// SubTopics which edge-client should be sub
SubTopics = []string{
"$hw/events/upload/#",
"$hw/events/device/+/state/update",
"$hw/events/device/+/twin/+",
"$hw/events/node/+/membership/get",
UploadTopic,
"+/user/#",
}

当获得这些 topic 消息时,通过 mqtt 的 subscribe 方法回调 OnSubMessageReceived。该函数判断 topic,”hw/events/device” 和 “hw/events/node” 开头发送给 DeviceTwin 模块,其他信息发送给 EdgeHub 模块:

1
2
3
4
5
6
7
8
9
10
11
12
13
14
15
16
17
18
19
20
21
22
23
// OnSubMessageReceived msg received callback
func OnSubMessageReceived(client MQTT.Client, msg MQTT.Message) {
klog.Infof("OnSubMessageReceived receive msg from topic: %s", msg.Topic())
// for "$hw/events/device/+/twin/+", "$hw/events/node/+/membership/get", send to twin
// for other, send to hub
// for "SYS/dis/upload_records", no need to base64 topic
var target string
var message *beehiveModel.Message
if strings.HasPrefix(msg.Topic(), "$hw/events/device") || strings.HasPrefix(msg.Topic(), "$hw/events/node") {
target = modules.TwinGroup
resource := base64.URLEncoding.EncodeToString([]byte(msg.Topic()))
// routing key will be $hw.<project_id>.events.user.bus.response.cluster.<cluster_id>.node.<node_id>.<base64_topic>
message = beehiveModel.NewMessage("").BuildRouter(modules.BusGroup, modules.UserGroup,
resource, messagepkg.OperationResponse).FillBody(string(msg.Payload()))
} else {
target = modules.HubGroup
message = beehiveModel.NewMessage("").BuildRouter(modules.BusGroup, modules.UserGroup,
msg.Topic(), beehiveModel.UploadOperation).FillBody(string(msg.Payload()))
}

klog.Info(fmt.Sprintf("Received msg from mqttserver, deliver to %s with resource %s", target, message.GetResource()))
beehiveContext.SendToGroup(target, *message)
}

InitPubClient

1
2
3
4
5
6
7
8
9
10
11
12
13
14
15
16
17
18
// InitPubClient init pub client
func (mq *Client) InitPubClient() {
timeStr := strconv.FormatInt(time.Now().UnixNano()/1e6, 10)
right := len(timeStr)
if right > 10 {
right = 10
}
// if PubClientID is NOT set, we need to generate it by ourselves.
if mq.PubClientID == "" {
mq.PubClientID = fmt.Sprintf("hub-client-pub-%s", timeStr[0:right])
}
pubOpts := util.HubClientInit(mq.MQTTUrl, mq.PubClientID, mq.Username, mq.Password)
pubOpts.OnConnectionLost = onPubConnectionLost
pubOpts.AutoReconnect = false
mq.PubCli = MQTT.NewClient(pubOpts)
util.LoopConnect(mq.PubClientID, mq.PubCli)
klog.Info("finish hub-client pub")
}

InitPubClient 创建了一个 MQTT client,然后调用 LoopConnect 每 5 秒钟连接一次 MQTT server,直到连接成功。如果失去连接,则通过 onPubConnectionLost 继续调用 InitPubClient。

pubCloudMsgToEdge

在启动/连接完 MQTT server 后,调用了 pubCloudMsgToEdge 方法:

1
2
3
4
5
6
7
8
9
10
11
12
13
14
15
16
17
18
19
20
21
22
23
24
25
26
27
28
29
30
31
32
33
34
35
36
37
38
39
40
41
42
43
44
45
46
47
48
49
50
51
52
53
54
55
56
57
58
func (eb *eventbus) pubCloudMsgToEdge() {
for {
select {
case <-beehiveContext.Done():
klog.Warning("EventBus PubCloudMsg To Edge stop")
return
default:
}
accessInfo, err := beehiveContext.Receive(eb.Name())
if err != nil {
klog.Errorf("Fail to get a message from channel: %v", err)
continue
}
operation := accessInfo.GetOperation()
resource := accessInfo.GetResource()
switch operation {
case messagepkg.OperationSubscribe:
eb.subscribe(resource)
klog.Infof("Edge-hub-cli subscribe topic to %s", resource)
case messagepkg.OperationUnsubscribe:
eb.unsubscribe(resource)
klog.Infof("Edge-hub-cli unsubscribe topic to %s", resource)
case messagepkg.OperationMessage:
body, ok := accessInfo.GetContent().(map[string]interface{})
if !ok {
klog.Errorf("Message is not map type")
continue
}
message := body["message"].(map[string]interface{})
topic := message["topic"].(string)
payload, _ := json.Marshal(&message)
eb.publish(topic, payload)
case messagepkg.OperationPublish:
topic := resource
// cloud and edge will send different type of content, need to check
payload, ok := accessInfo.GetContent().([]byte)
if !ok {
content, ok := accessInfo.GetContent().(string)
if !ok {
klog.Errorf("Message is not []byte or string")
continue
}
payload = []byte(content)
}
eb.publish(topic, payload)
case messagepkg.OperationGetResult:
if resource != "auth_info" {
klog.Info("Skip none auth_info get_result message")
continue
}
topic := fmt.Sprintf("$hw/events/node/%s/authInfo/get/result", eventconfig.Config.NodeName)
payload, _ := json.Marshal(accessInfo.GetContent())
eb.publish(topic, payload)
default:
klog.Warningf("Action not found")
}
}
}

pubCloudMsgToEdge 执行以下操作:

  1. 从 beehive 获取消息
  2. 获取消息的 operation 和 resource
  3. 当动作为 subscribe 时从 MQTT 订阅 resource(topic) 消息;当动作为 unsubscribe 时从 MQTT 取消订阅 resource(topic) 消息
  4. 当动作为 message 时,将消息的 message 根据消息的 topic 发送给 MQTT broker,消息类型是一个 map
  5. 当动作为 publish 时,将消息发送给 MQTT broker,消息为一个字符串,topic 和 resource 一致
  6. 当动作为 getResult 时,resource 必须为 auth_info,然后发送消息到 “hw/events/node/eventconfig.Config.NodeName/authInfo/get/result” 这一个 topic

ServiceBus

edge/pkg/servicebus/servicebus.go:

1
2
3
4
5
6
7
8
9
10
11
12
13
14
15
16
17
18
19
20
21
22
23
24
25
26
27
28
func (sb *servicebus) Start() {
// no need to call TopicInit now, we have fixed topic
htc.Timeout = time.Second * 10
uc.Client = htc
if !dao.IsTableEmpty() {
if atomic.CompareAndSwapInt32(&inited, 0, 1) {
go server(c)
}
}
//Get message from channel
for {
select {
case <-beehiveContext.Done():
klog.Warning("servicebus stop")
return
default:
}
msg, err := beehiveContext.Receive(modules.ServiceBusModuleName)
if err != nil {
klog.Warningf("servicebus receive msg error %v", err)
continue
}

// build new message with required field & send message to servicebus
klog.V(4).Info("servicebus receive msg")
go processMessage(&msg)
}
}

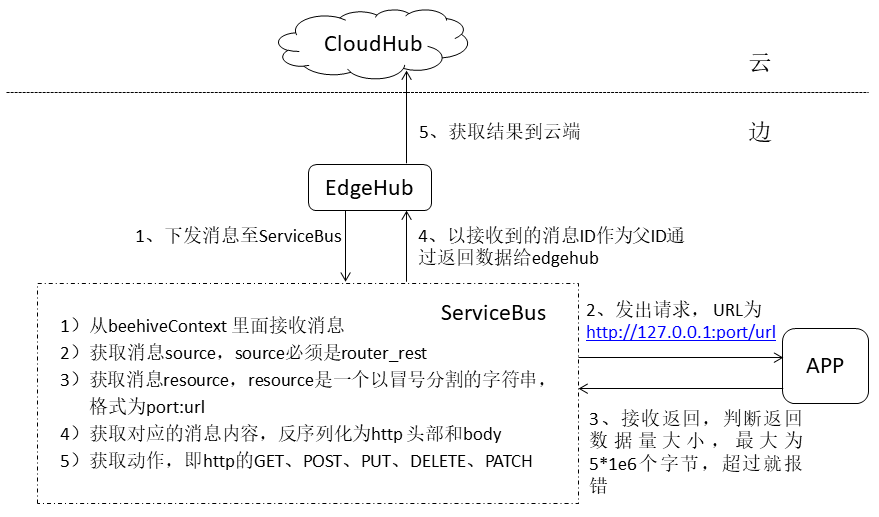
ServiceBus 接受来自 beehive 的消息,然后启动一个 processMessage 协程基于消息中带的参数,将消息通过 REST-API 发送到本地 127.0.0.1 上的目标 APP。相当于一个客户端,而 APP 是一个 http Rest-API server,所有的操作和设备状态都需要客户端调用接口来下发和获取。ServiceBus 执行过程图如下:

参考

  1. kubeedge edgecore - EventBus源码分析
  2. 【KubeEdge】 ServiceBus分析

KubeEdge 边缘部分 DeviceTwin 简析

本文基于 commit 9a7e140b42abb4bf6bcabada67e3568f73964278。

概述

DeviceTwin 负责存储设备状态(传感器的值等)并将设备状态同步到云,它还为应用程序提供查询接口。它由四个子模块组成(membership 模块,communication 模块,device 模块和 device twin 模块)。

DeviceTwin 注册

DeviceTwin 注册也调用了 InitDBTable,在 SQLite 数据库中初始化了三张表 Device,DeviceAttr 与 DeviceTwin:

1
2
3
4
5
6
7
8
9
10
11
12
13
14
15
16
17
18
19
20
21
22
23
24
25
26
27
28
29
30
31
32
33
34
35
36
37
//Device the struct of device
type Device struct {
ID string `orm:"column(id); size(64); pk"`
Name string `orm:"column(name); null; type(text)"`
Description string `orm:"column(description); null; type(text)"`
State string `orm:"column(state); null; type(text)"`
LastOnline string `orm:"column(last_online); null; type(text)"`
}

//DeviceAttr the struct of device attributes
type DeviceAttr struct {
ID int64 `orm:"column(id);size(64);auto;pk"`
DeviceID string `orm:"column(deviceid); null; type(text)"`
Name string `orm:"column(name);null;type(text)"`
Description string `orm:"column(description);null;type(text)"`
Value string `orm:"column(value);null;type(text)"`
Optional bool `orm:"column(optional);null;type(integer)"`
AttrType string `orm:"column(attr_type);null;type(text)"`
Metadata string `orm:"column(metadata);null;type(text)"`
}

//DeviceTwin the struct of device twin
type DeviceTwin struct {
ID int64 `orm:"column(id);size(64);auto;pk"`
DeviceID string `orm:"column(deviceid); null; type(text)"`
Name string `orm:"column(name);null;type(text)"`
Description string `orm:"column(description);null;type(text)"`
Expected string `orm:"column(expected);null;type(text)"`
Actual string `orm:"column(actual);null;type(text)"`
ExpectedMeta string `orm:"column(expected_meta);null;type(text)"`
ActualMeta string `orm:"column(actual_meta);null;type(text)"`
ExpectedVersion string `orm:"column(expected_version);null;type(text)"`
ActualVersion string `orm:"column(actual_version);null;type(text)"`
Optional bool `orm:"column(optional);null;type(integer)"`
AttrType string `orm:"column(attr_type);null;type(text)"`
Metadata string `orm:"column(metadata);null;type(text)"`
}

模块入口

edge/pkg/devicetwin/devicetwin.go:

1
2
3
4
5
6
7
8
9
10
11
// Start run the module
func (dt *DeviceTwin) Start() {
dtContexts, _ := dtcontext.InitDTContext()
dt.DTContexts = dtContexts
err := SyncSqlite(dt.DTContexts)
if err != nil {
klog.Errorf("Start DeviceTwin Failed, Sync Sqlite error:%v", err)
return
}
dt.runDeviceTwin()
}

主要就是 SyncSqlite 和 runDeviceTwin

SyncSqlite

SyncSqlite 最终会执行 SyncDeviceFromSqlite:

1
2
3
4
5
6
7
8
9
10
11
12
13
14
15
16
17
18
19
20
21
22
23
24
25
26
27
28
29
30
31
32
33
34
35
36
37
38
39
40
41
42
43
44
45
46
47
48
func SyncDeviceFromSqlite(context *dtcontext.DTContext, deviceID string) error {
klog.Infof("Sync device detail info from DB of device %s", deviceID)
_, exist := context.GetDevice(deviceID)
if !exist {
var deviceMutex sync.Mutex
context.DeviceMutex.Store(deviceID, &deviceMutex)
}

defer context.Unlock(deviceID)
context.Lock(deviceID)

devices, err := dtclient.QueryDevice("id", deviceID)
if err != nil {
klog.Errorf("query device failed: %v", err)
return err
}
if len(*devices) <= 0 {
return errors.New("Not found device from db")
}
device := (*devices)[0]

deviceAttr, err := dtclient.QueryDeviceAttr("deviceid", deviceID)
if err != nil {
klog.Errorf("query device attr failed: %v", err)
return err
}
attributes := make([]dtclient.DeviceAttr, 0)
attributes = append(attributes, *deviceAttr...)

deviceTwin, err := dtclient.QueryDeviceTwin("deviceid", deviceID)
if err != nil {
klog.Errorf("query device twin failed: %v", err)
return err
}
twins := make([]dtclient.DeviceTwin, 0)
twins = append(twins, *deviceTwin...)

context.DeviceList.Store(deviceID, &dttype.Device{
ID: deviceID,
Name: device.Name,
Description: device.Description,
State: device.State,
LastOnline: device.LastOnline,
Attributes: dttype.DeviceAttrToMsgAttr(attributes),
Twin: dttype.DeviceTwinToMsgTwin(twins)})

return nil
}

这段函数主要执行了以下操作:

  1. 检查设备是否在上下文中(设备列表存储在上下文中),如果不在则添加一个 deviceMutex 至上下文中
  2. 从数据库中查询设备
  3. 从数据库中查询设备属性
  4. 从数据库中查询 Device Twin
  5. 将设备、设备属性和 Device Twin 数据合并为一个结构,并将其存储在上下文中

runDeviceTwin

1
2
3
4
5
6
7
8
9
10
11
12
13
14
15
16
17
18
19
20
21
22
23
24
25
26
27
28
29
30
31
32
33
34
35
36
37
38
39
40
41
42
43
44
45
46
47
48
49
50
func (dt *DeviceTwin) runDeviceTwin() {
moduleNames := []string{dtcommon.MemModule, dtcommon.TwinModule, dtcommon.DeviceModule, dtcommon.CommModule}
for _, v := range moduleNames {
dt.RegisterDTModule(v)
go dt.DTModules[v].Start()
}
go func() {
for {
select {
case <-beehiveContext.Done():
klog.Warning("Stop DeviceTwin ModulesContext Receive loop")
return
default:
}
if msg, ok := beehiveContext.Receive("twin"); ok == nil {
klog.Info("DeviceTwin receive msg")
err := dt.distributeMsg(msg)
if err != nil {
klog.Warningf("distributeMsg failed: %v", err)
}
}
}
}()

for {
select {
case <-time.After((time.Duration)(60) * time.Second):
//range to check whether has bug
for dtmName := range dt.DTModules {
health, ok := dt.DTContexts.ModulesHealth.Load(dtmName)
if ok {
now := time.Now().Unix()
if now-health.(int64) > 60*2 {
klog.Infof("%s health %v is old, and begin restart", dtmName, health)
go dt.DTModules[dtmName].Start()
}
}
}
for _, v := range dt.HeartBeatToModule {
v <- "ping"
}
case <-beehiveContext.Done():
for _, v := range dt.HeartBeatToModule {
v <- "stop"
}
klog.Warning("Stop DeviceTwin ModulesHealth load loop")
return
}
}
}

runDeviceTwin 主要执行了以下操作:

  1. 启动 devicetwin 中四个的子模块,子模块代码在 edge/pkg/devicetwin/dtmanager 下
  2. 轮询接收消息,执行 distributeMsg。将收到的消息发送给 communication 模块,对消息进行分类,即消息是来自 EventBus、EdgeManager 还是 EdgeHub,并填充 ActionModuleMap,再将消息发送至对应的子模块
  3. 定期(默认60s)向子模块发送 “ping” 信息。每个子模块一旦收到 “ping” 信息,就会更新自己的时间戳。控制器检查每个模块的时间戳是否超过 2 分钟,如果超过则重新启动该子模块。

Membership 模块

Membership 模块的主要作用是为新设备添加提供资格,该模块将新设备与边缘节点绑定,并在边缘节点和边缘设备之间建立相应关系。它主要执行以下操作:

  1. 初始化 memActionCallBack,它的类型是 map[string]Callback,包含可执行的动作函数
  2. 接收消息
  3. 对于每条消息,都会调用相应动作函数
  4. 接收心跳信息,并向控制器发送心跳信号

以下是可由 Membership 模块执行的动作函数:

  • dealMembershipGet:从缓存中获取与特定边缘节点相关的设备信息
  • dealMembershipUpdated:更新节点的成员信息
  • dealMembershipDetail:提供了边缘节点的成员详细信息

Twin 模块

Twin 模块的主要作用是处理所有与 device twin 相关的操作。它可以执行诸如更新 device twin、获取 device twin 和同步 device twin 到云的操作。它执行的操作与 Membership 模块类似。

以下是可由 Twin 模块执行的动作函数:

  • dealTwinUpdate:更新一个特定设备的 device twin 信息
  • dealTwinGet:提供一个特定设备的 device twin 信息
  • dealTwinSync:将 device twin 信息同步到云端

Communication 模块

Communication 模块的主要作用是确保设备双胞胎和其他组件之间的通信功能。它主要执行以下操作:

  1. 初始化 memActionCallBack,它的类型是 map[string]Callback,包含可执行的动作函数
  2. 接收消息
  3. 对于每条消息,都会调用相应动作函数
  4. 确认消息中指定的动作是否完成,如果动作没有完成则重做该动作
  5. 接收心跳信息,并向控制器发送心跳信号

以下是可由 Communication 模块执行的动作函数:

  • dealSendToCloud:用于发送数据到 cloudhub。这个函数首先确保云边是连接的,然后将消息发送到 edgehub 模块,edgehub 将消息转发给云
  • dealSendToEdge:用于发送数据给边缘的其他模块。这个函数将收到的消息发送到 edgehub 模块,edgehub 将消息转发给其他模块
  • dealLifeCycle:检查是否连接到云并且 twin 的状态是否为断开,将状态改为连接并将节点的详细信息发送给 edgehub;如果未连接到云,就把 twin 的状态设置为断开
  • dealConfirm:检查消息的类型是否正确,然后从 ConfirmMap 中删除 msgID

Device 模块

Device 模块的主要作用是执行与设备有关的操作,如设备状态更新和设备属性更新。它执行的操作与 Membership 模块类似。

以下是可由 Device 模块执行的动作函数:

  • dealDeviceUpdated:处理的是当遇到设备属性更新时要执行的操作。更新设备属性,比如在数据库中增加属性、更新属性和删除属性
  • dealDeviceStateUpdate:处理的是当遇到设备状态更新时要执行的操作。更新设备的状态以及数据库中设备的最后在线时间

More

关于执行动作函数的流程以及 Device,DeviceAttr 与 DeviceTwin 这三张表中字段的描述请见 DeviceTwin

KubeEdge 边缘部分 MetaManager 简析

本文基于 commit 9a7e140b42abb4bf6bcabada67e3568f73964278。

概述

MetaManager 是消息处理器,位于 Edged 和 Edgehub 之间,它负责向轻量级数据库 (SQLite) 持久化/检索元数据。

MetaManager 注册

和其他模块注册相比,metamanager 注册最大的不同就是它还调用了 initDBTable 在 SQLite 数据库中初始化了两张表 Meta 与 MetaV2:

1
2
3
4
5
6
7
8
9
10
11
12
13
14
15
16
17
18
19
20
21
22
23
24
25
26
27
28
29
// Meta metadata object
type Meta struct {
Key string `orm:"column(key); size(256); pk"`
Type string `orm:"column(type); size(32)"`
Value string `orm:"column(value); null; type(text)"`
}

// MetaV2 record k8s api object
type MetaV2 struct {
// Key is the primary key of a line record, format like k8s obj key in etcd:
// /Group/Version/Resources/Namespace/Name
//0/1 /2 /3 /4 /5
// /core/v1/pods/{namespaces}/{name} normal obj
// /core/v1/pods/{namespaces} List obj
// /extensions/v1beta1/ingresses/{namespaces}/{name} normal obj
// /storage.k8s.io/v1beta1/csidrivers/null/{name} cluster scope obj
Key string `orm:"column(key); size(256); pk"`
// GroupVersionResource are set buy gvr.String() like "/v1, Resource=endpoints"
GroupVersionResource string `orm:"column(groupversionresource); size(256);"`
// Namespace is the namespace of an api object, and set as metadata.namespace
Namespace string `orm:"column(namespace); size(256)"`
// Name is the name of api object, and set as metadata.name
Name string `orm:"column(name); size(256)"`
// ResourceVersion is the resource version of the obj, and set as metadata.resourceVersion
ResourceVersion uint64 `orm:"column(resourceversion); size(256)"`
// Value is the api object in json format
// TODO: change to []byte
Value string `orm:"column(value); null; type(text)"`
}

模块入口

edge/pkg/metamanager/metamanager.go:

1
2
3
4
5
6
7
8
9
10
11
12
13
14
15
16
17
18
19
20
21
22
23
func (m *metaManager) Start() {
if metaserverconfig.Config.Enable {
imitator.StorageInit()
go metaserver.NewMetaServer().Start(beehiveContext.Done())
}
go func() {
period := getSyncInterval()
timer := time.NewTimer(period)
for {
select {
case <-beehiveContext.Done():
klog.Warning("MetaManager stop")
return
case <-timer.C:
timer.Reset(period)
msg := model.NewMessage("").BuildRouter(MetaManagerModuleName, GroupResource, model.ResourceTypePodStatus, OperationMetaSync)
beehiveContext.Send(MetaManagerModuleName, *msg)
}
}
}()

m.runMetaManager()
}

启动时,开启两个协程,一个用于定时(默认60s)给自己发送消息通知进行边到云的 podstatus 数据同步(KubeEdge 实现了边缘自治,需要将数据同步到云端,网络断开后如果网络恢复,就能立刻将边端的状态进行反馈);另一个 runMetaManager 用于 edgehub 与 edged 的消息,然后调用 m.process(msg) 进行处理。

process 函数获取消息的操作的类型,然后根据信息操作类型对信息进行相应处理:

1
2
3
4
5
6
7
8
9
10
11
12
13
14
15
16
17
18
19
20
21
22
23
24
25
26
27
28
29
30
func (m *metaManager) process(message model.Message) {
operation := message.GetOperation()
switch operation {
case model.InsertOperation:
m.processInsert(message)
case model.UpdateOperation:
m.processUpdate(message)
case model.DeleteOperation:
m.processDelete(message)
case model.QueryOperation:
m.processQuery(message)
case model.ResponseOperation:
m.processResponse(message)
case messagepkg.OperationNodeConnection:
m.processNodeConnection(message)
case OperationMetaSync:
m.processSync()
case OperationFunctionAction:
m.processFunctionAction(message)
case OperationFunctionActionResult:
m.processFunctionActionResult(message)
case constants.CSIOperationTypeCreateVolume,
constants.CSIOperationTypeDeleteVolume,
constants.CSIOperationTypeControllerPublishVolume,
constants.CSIOperationTypeControllerUnpublishVolume:
m.processVolume(message)
default:
klog.Errorf("metamanager not supported operation: %v", operation)
}
}

具体的处理函数 processInsert、processUpdate 等的具体过程不再分析,大致都是对数据库进行操作,然后再通知 edgehub 或 edged。

KubeEdge 边缘部分 EdgeHub 简析

本文基于 commit 9a7e140b42abb4bf6bcabada67e3568f73964278。

概述

EdgeHub 是一个 Web Socket 客户端,负责与边缘计算的云端交互,包括同步云端资源更新、报告边缘主机和设备状态变化到云端等功能。

模块入口

edge/pkg/edgehub/edgehub.go:

1
2
3
4
5
6
7
8
9
10
11
12
13
14
15
16
17
18
19
20
21
22
23
24
25
26
27
28
29
30
31
32
33
34
35
36
37
38
39
40
41
42
43
44
45
46
47
48
49
50
51
52
53
54
55
56
57
58
59
60
//Start sets context and starts the controller
func (eh *EdgeHub) Start() {
eh.certManager = certificate.NewCertManager(config.Config.EdgeHub, config.Config.NodeName)
eh.certManager.Start()

HasTLSTunnelCerts <- true
close(HasTLSTunnelCerts)

go eh.ifRotationDone()

for {
select {
case <-beehiveContext.Done():
klog.Warning("EdgeHub stop")
return
default:
}
err := eh.initial()
if err != nil {
klog.Exitf("failed to init controller: %v", err)
return
}

waitTime := time.Duration(config.Config.Heartbeat) * time.Second * 2

err = eh.chClient.Init()
if err != nil {
klog.Errorf("connection failed: %v, will reconnect after %s", err, waitTime.String())
time.Sleep(waitTime)
continue
}
// execute hook func after connect
eh.pubConnectInfo(true)
go eh.routeToEdge()
go eh.routeToCloud()
go eh.keepalive()

// wait the stop signal
// stop authinfo manager/websocket connection
<-eh.reconnectChan
eh.chClient.UnInit()

// execute hook fun after disconnect
eh.pubConnectInfo(false)

// sleep one period of heartbeat, then try to connect cloud hub again
klog.Warningf("connection is broken, will reconnect after %s", waitTime.String())
time.Sleep(waitTime)

// clean channel
clean:
for {
select {
case <-eh.reconnectChan:
default:
break clean
}
}
}
}

edgehub 启动主要有以下几步:

  1. 设置证书,从 cloudcore 申请证书(若正确配置本地证书,则直接使用本地证书),然后进入循环
  2. 调用 eh.initial() 创建 eh.chClient,接着调用 eh.chClient.Init(),初始化过程建立了 websocket/quic 的连接
  3. 调用 eh.pubConnectInfo(true),向 edgecore 各模块广播已经连接成功的消息
  4. go eh.routeToEdge(),执行 eh.chClient.Receive() 接收消息,将从云上部分收到的消息转发给指定边缘部分的模块 (MetaManager/DeviceTwin/EventBus/ServiceBus)
  5. go eh.routeToCloud(),执行 beehiveContext.Receive(modules.EdgeHubModuleName) 接收来自边缘 (MetaManager/DeviceTwin/EventBus/ServiceBus) 的信息,并执行 eh.sendToCloud(message) 发到 cloudhub
  6. go eh.keepalive(),向 cloudhub 发送心跳信息

另外,当云边消息传送过程中出现错误时,边缘部分会重新 init 相应的 websocket/quic client,与云端重新建立连接。